To add or modify measurements, select “Settings > Measurements > Measurements”.
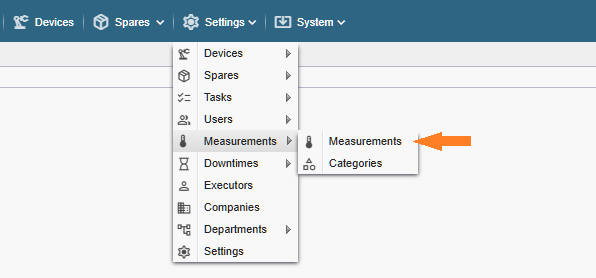
Note! If you do not see the referenced menu links in the Alldevice CMMS application, you either lack the necessary permission to manage measurements or the measurement functionality has not been activated.
The opened page displays all created measurement templates.
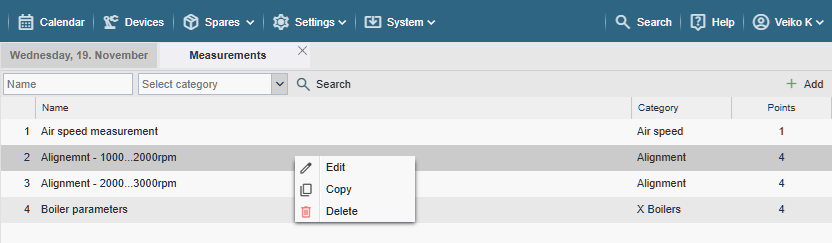
- Name: Measurement name
- Category: Measurement category
- Points: Number of measurement points included in the measurement template
To edit, copy, or delete a measurement template, right-click on the desired row and select the appropriate option from the context menu.
Note! Double-clicking the desired row also activates editing.
To add a measurement, click the “+ Add” button located in the top right corner of the page.

Name: Assign a name to the new measurement. Choose a name that is clearly distinguishable so that you can easily find it later among many other measurements in the list.
Category: Select a category for the measurement. If the desired option is not listed, choose the last item “Add new…” and enter the name of the desired category.
If you made a typo when entering a new name, don’t worry — you can correct it later via Settings > Work Orders > Measurement Categories.
The category name is used internally in filters within the application. It is not displayed on work orders or completed work reports.
To add a measurement point, click the “+ Add” button, fill in the fields, and repeat the process until all desired points have been listed.

Measurement points: This name will later appear in the measurement table on the task. Choose a name that is clear and unambiguous to avoid confusion for the technician performing the work (required field)
Alarm (LL, HH) and Warning (L, H): Each measurement point can be configured with both low and high warning and alarm thresholds.
L (Low) and H (High): If the entered measurement value is lower than the Warning (L) threshold or exceeds the Warning (H) threshold, the background of the input field on the work order will turn yellow. Additionally, an icon (an upward or downward arrow) will be displayed to indicate which threshold was exceeded — the lower or the upper.
LL (Low-Low) and HH (High-High): If the entered measurement value is lower than the Alarm (LL) threshold or higher than the Alarm (HH) threshold, the background of the input field on the work order will turn red. Additionally, an icon (an upward or downward arrow) will be displayed to indicate which threshold was exceeded — the lower or the upper.
Unit: Specify the unit of the measurement parameter (required field).
To change the order of measurement points in the table, click and hold the dotted area at the end of the row, then drag the row to the desired position.
Once all desired measurement points have been added, click the “Save” button and close the window.