See also: Icons | Color code
Moving columns
In the Alldevice interface, you can customize table layouts to suit your needs. To rearrange columns, click the column header, hold the left mouse button, and drag the column to the position you want.

Showing and hiding columns
To hide or display table columns, hover over the right side of any column until a small triangle appears, then click it. From the dropdown menu, choose ‘Columns’ and enable or disable the columns you need.

Your customized table layout is saved in the application’s memory, so your column preferences will remain in place the next time you log in.
Using filters
If you have active filters in a table, they are saved to your user profile as well. A blue “Clear” button appears to indicate that filters are currently applied

When a table contains many records, they are split into pages. You can move between pages using the navigation buttons in the bottom-left corner of the table. On the right side, you’ll also find a button for refreshing the table data.

In the bottom-right corner of the table, you can select how many rows are shown on each page. On the left, you’ll find a summary indicating the total number of rows and which range of rows is currently visible.

Using the date filter
As of version 1.6.44, the application uses a new date picker window.
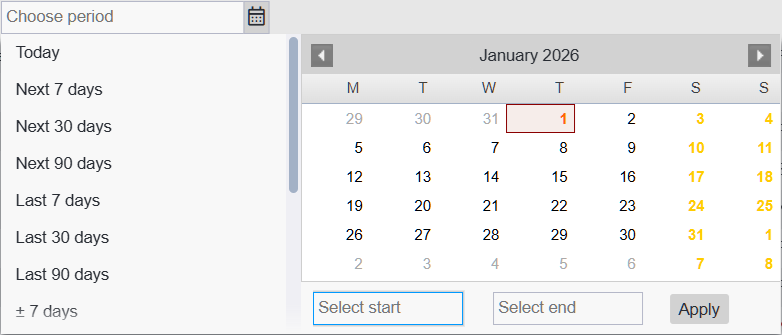
On the left side of the window, you’ll see shortcuts for preset date ranges. All of these shortcuts use dynamic dates. In practice, this means that choosing “Last 7 days” will always show the most recent 7 days — even tomorrow — rather than “7 days from yesterday”.

A refresh icon displayed before the filter indicates that the selection is dynamic.
On the right side of the date filter window, you’ll find a calendar that lets you select either a full date range or just a start and end date.
To select a date range, click the desired start date and then the end date. The chosen dates will also appear in the start and end fields below the calendar. The range is applied to the filter instantly, so you don’t need to press “Apply”. If you enter the start or end date manually, then you do need to confirm it by clicking “Apply”.

A lock icon shown before the filter indicates that the selected date range is fixed rather than dynamic.
To set the “From” date in the date filter, activate the “Select start” field, pick the desired date, and confirm by clicking “Apply” (You can leave the end date empty if you want to see results starting from the selected date.) .

Three dots shown after the date indicate that the end date has not been set.
To set the “To” date in the date filter, activate the “Select end” field, pick the desired date, and confirm by clicking “Apply”.

Three dots shown before the date indicate that the start date has not been set.
Filter memories
Most tables include an option to save your filter and column settings. A small toggle switch in the top‑right corner of the table header lets you show or hide the memory buttons. Clicking it reveals or hides the filter memory slots.


Memory slots that contain saved settings are highlighted with a background color, while empty slots appear grey.
To save your filter setup, first apply the filters you want and arrange the columns as needed. Then right‑click the memory slot you want to use and select “Save” from the context menu.
To clear a filter memory slot, open the context menu and choose “Clear”.
To rename a filter button, open its context menu and choose “Rename”. The name can be up to 10 characters in length.
Remember!
When you modify or clear filters, the changes are not saved automatically. However, the most recently applied filter state is remembered the next time you use the table — just like before.
Saved filter memories are specific to each user and are not shared with others.