To add, change or delete downtime categories, select “Settings > Downtimes > Categories”.
PS! If you do not see the menu items referenced in the Alldevice CMMS application, you do not have privilege to manage downtime categories or downtimes functionality is not active.
To add a category, click on the “+ Add” button and enter the desired name. Then click on the “Save” button or press the “Enter” key on your keyboard.
It is not possible to add categories with identical names. If this is the case, a message will be displayed when saving.
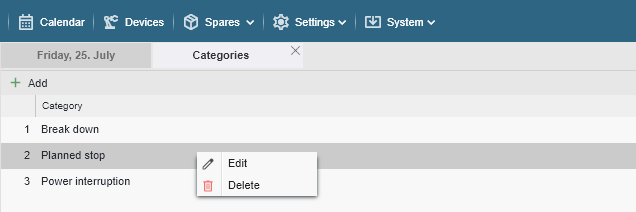
To change the name of a category, right-click on the desired line and select “Edit” from the context menu that appears, or double-click on the desired line with the left mouse button. Make the changes and click “Save” or press “Enter” from the keyboard.
To delete a category, right-click on the desired line and select “Delete” from the context menu that opens.
Why use categories for downtime?
It helps distinguish between different types of downtimes later on. For example, downtime may be either planned or unplanned. At the end of a certain period, we’d like to summarize how long a device has been inactive and whether it was a planned or unexpected stop. Unplanned downtime can be caused by a malfunction, lack of input resources (electricity supply, water, etc…), or some other factors.
Some examples:
- Planned downtime
- Device malfunction
- Power outage
- …
Think about what relates most to your household and create categories accordingly. At the same time, don’t worry too much about categorizing everything upfront—they can be created on the go, as needed. Category names can be changed later, and events re-categorized if necessary. Sure, it takes extra work—but it’s absolutely possible.