In the custom fields management window, you can see all the custom fields already created (if any), as well as manage the printout of standard fields in the Task, Completed task report and the spare parts card information printout.
The top half of the window brings together all the standard fields on the spare part card (for example: Code, Name, etc…).
The checkbox in front of the Task, Work report, or Spare part card column allows you to print this field on the corresponding document. In the columns Task and Work report, the relative width of the column displayed in the printout is the width of the whole table. The sum of the widths of the selected columns shall not exceed 100%.
I admit that this solution is not the most straightforward and user-friendly, and it will be redesigned in the near future.
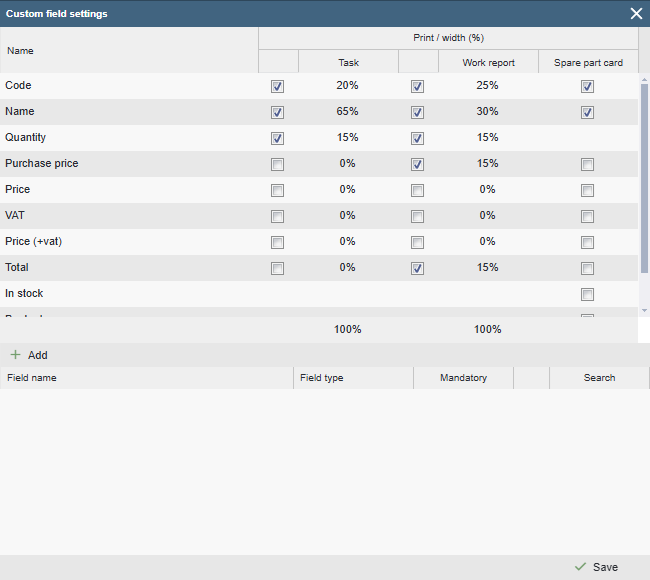
The bottom half of the window displays all the custom fields created in the application.
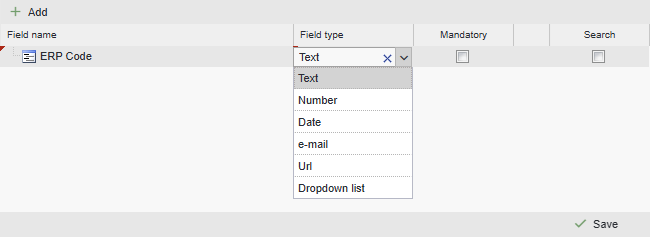
Adding fields
To add a field, press [ + Add ] and fill in the name field. Then select the type.
- Text: Possible to enter numbers, letters, symbols.
- Number: only numbers can be entered (in this case, we recommend adding a unit or specification to the field name as in the example above).
- Date: only the date can be entered. A calendar button to select the date appears next to the field.
- Email: only email address can be entered (one address per field).
- Url: It is possible to enter the address of a web link and open it with a single click on the device card.
- Dropdown list : it is possible to create a drop-down menu with presets. After selecting the drop-down menu type, you must save the data and you will be presented with a button on the right side of the field, which, when clicked, opens a window where you can create and edit drop-down menu options.
Mandatory: When a parameter is flagged, it is not possible to save the spare part card until this field is filled.
Search: Adds a magnifier button next to the input field, allowing you to activate a search for other spares in the same custom field. This is useful if you want to keep this field similar to the data font. After entering the first few characters, values from other spare part fields are offered. This way, it is possible to quickly find the desired match and click it in the given field.
When all the necessary steps have been done, click on the “Save” button.