In the Manage custiom fields window, you can see all the additional fields that have already been created (if any).
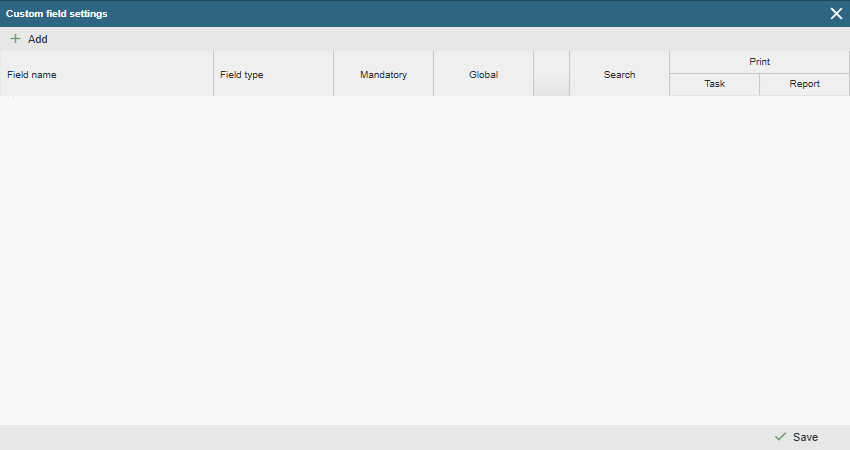
To create a new custom field, click on the “Add” button and enter a name in the added row.

Then select the type:
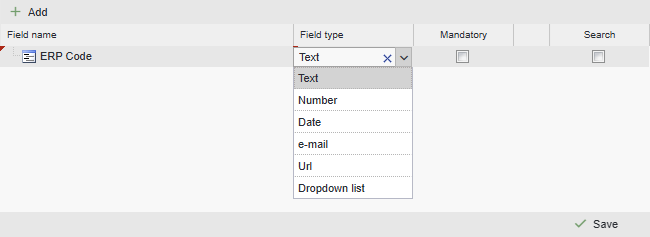
- Email: only email address can be entered (one address per field).
- GPS: … coming soon …
- Date: only the date can be entered. A calendar button to select the date appears next to the field.
- Number: only numbers can be entered (in this case, we recommend adding a unit or specification to the field name as in the example above).
- Drop-down menu: it is possible to create a drop-down menu with presets. After selecting the drop-down menu type, you must save the data and you will be presented with a button on the right side of the field, which, when clicked, opens a window where you can create and edit drop-down menu options.

To add options, click on the “Add” button and enter the desired option in the box that opens. To change an option, double-click on the desired line. Once you have made your changes, click on the ‘Save’ button. To delete a selection, right-click on the desired row and select ‘Delete’ from the drop-down menu that appears.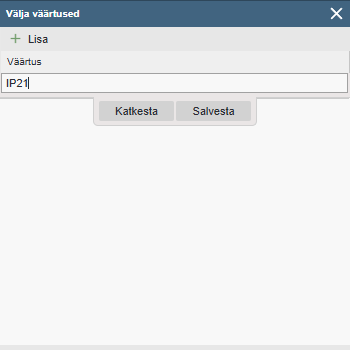
- Text: Possible to enter numbers, letters, symbols.
- Text area: A multi‑line text input field. It allows entering longer and multi‑line text. On the device card and in printouts, it uses a wider area (full width) compared to a standard text field.
- Phone: For this field type, the entered number becomes a clickable link inside the application. Selecting it allows the user to choose which application should handle the number. In the mobile version, a call icon is displayed next to the phone number, enabling direct calling to the selected number with a single tap.
- Url: It is possible to enter the address of a web link and open it with a single click on the device card.
Mandatory: When a parameter is flagged, it is not possible to save the device map until this field is filled.

Granting mandatory status to a field has global implications. Everywhere (device categories) where this field is used it is mandatory. However, it is also possible to make the field mandatory depending on the selected device category ( Settings > Devices > Categories >…. [ Custom fields ] ).
NB! Think carefully before mandating. Don’t overdo mandatory fields. Only do this if the field is truly mandatory (vitally important, better not to record data or create a card than to record a device card with missing data). If it is more of a “it would be nice if it could always be filled in” type of mandatory field, leave it optional. Otherwise, users may fill in the field with “something” in order to be able to store the card. In this way you may inadvertently collect unreliable data.
Global: When a parameter is flagged, this custom field will be displayed on all device cards, regardless of the device category.

Device‑card custom fields are divided into two groups:
- Global custom fields – fields that are displayed by default on all device cards. They are always present there.
- Non‑global custom fields (category‑based custom fields) – fields that are displayed only on devices that belong to specific device categories.
For example: We would like each device card to have a date of purchase of the device. To do this, we will create a new custom field and make it global, and it will be displayed on every device card.
We wish to store the technical parameters of the unit (power (kW), capacity (m3/h), number of revolutions (rpm) , filter mesh size (um), etc.). In this case, it is not reasonable to make these fields global, as in this case they will be displayed on all the equipment cards and also on equipment for which the given parameter is not appropriateIf we have an electric motor, we want to store its power (kW) but the mesh size of the filter network (um) is not appropriate here. Or conversely, we have a simple mud filter for water, we want to store the mesh size (um) of the network but the power (kW) is not at all appropriate here.
If we make all the fields global we will have device maps with a huge number of fields, most of which may never be filled.
Global fields also have their advantages:
– The device tree search can be configured to find data also (or only) from the selected custom field. For non-global auxiliary fields, only all fields can be searched in total.
We recommend using global fields only to collect data that is appropriate for all (or the vast majority of) device maps.
Field visible in table: Allows specifying whether this custom field should also appear in the column list of work‑order‑related tables, making it available for display there.
Search: Adds a hatch button next to the input field, allowing you to activate a search for other devices in the same custom field. This is useful if you want to keep this field similar to the data font. After entering the first few characters, values from other device fields are offered. This way, it is possible to quickly find the desired match and click it in the given field.

Print: This section defines whether the information from this field is included in documents, and if so, which specific document it is added to.
- Task: This data field is always included in the task printout (PDF).
- Report: This data field is always included in the printout (PDF) of the completed task report.

PS! Here, the definition of printing has a global impact. If you leave printing unselected, it can be set in the custom fields setting of the device category.
Read more: settings > Equipment > Categories